JWT keys
JSON Web Token (JWT) keys are one of two types of keys your application can use to connect to Izuma Device Management.
JWT keys provide access to Izuma Device Management through a REST API. Izuma Device Management grants authorization based on policies associated with the application the JWT key belongs to.
Izuma Device Management uses verification keys to validate REST API requests made with JWT keys.
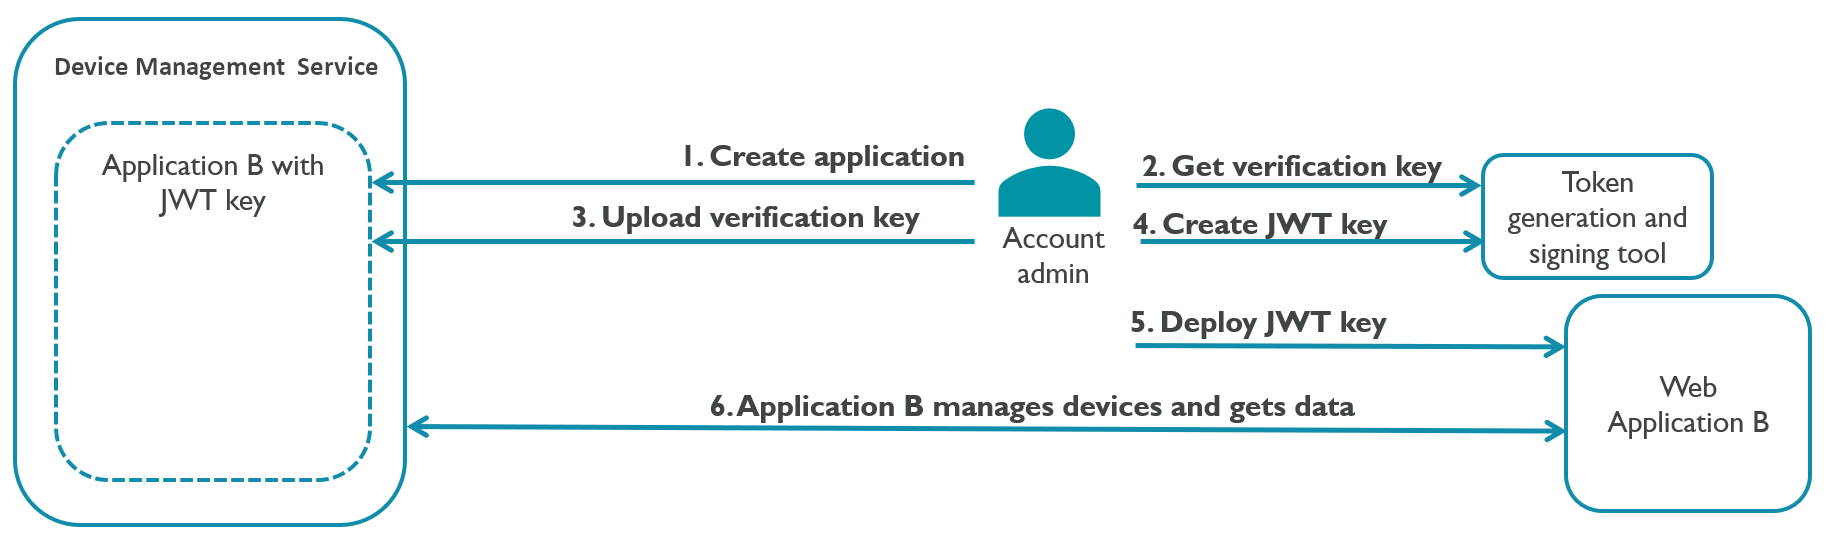
As the image shows, the first steps to connect your application with JWT keys are:
-
In this approach, the private key stays in your own secure environment, and you can configure Izuma Device Management with the public key only.
-
To make requests to Device Management REST APIs using JWT keys, a standard JWT structure is followed. For more information about JWT, please see JWT's Introduction to JSON Web Tokens.
Creating and uploading a verification key
An administrator user must first create a verification key and upload it to Izuma Device Management. This verification key is a certificate in X.509 format. Izuma Device Management uses the verification key to verify the JWT key.
Creating a verification key
The certificate must be in X.509 PEM format. Supported algorithms for generating certificates are RSA and EC.
| Algorithm | RSA | EC |
|---|---|---|
| Minimum key length | 2048 | 256 |
-
Create a public-private key pair and its matching certificate.
Example of generated RSA
private key:-----BEGIN RSA PRIVATE KEY----- MIIBOAIBAAJAUMlo38ZNfWFsiJPgQ6xiA3RhXACgBLQn/X1pLZ1tG+jcT7k9gFgS ... jPLv7ClnP+9DQHcBhr804anO1aGBFsQytRA8yg== -----END RSA PRIVATE KEY-----Example of generated RSA
certificate:-----BEGIN CERTIFICATE----- MIIDkDCCAngCCQDw4q5uD8rVzTANBgkqhkiG9w0BAQsFADCBiTELMAkGA1UEBhMC ... 3etRacKHAPizSjr+nDoRabtYyNCpcYpzWJjctfbAgcCpwwPJqi5B3KO9B/2Em8Yr -----END CERTIFICATE----- -
Store the private key in your own secure location. The public key is part of the created certificate.
Uploading a verification key
A verification key is attached to an application. Before uploading a verification key, there must be at least one existing application in the account. To create the application first, see Create application.
-
In Portal, go to Applications.
-
Click an application name.
-
In the Application panel, click Attributes.
- Locate the
application IDvalue from the id field. Memorize theapplication IDvalue for later.
- Locate the
-
In the Application panel, click verification keys.
-
Click the Add drop-down menu.
-
Click Upload verification key.
-
Populate the fields on the Upload verification key screen:
-
Verification key name: Give an easily recognizable name. The name must be unique.
-
Certificate: Provide previously created unique certificate in X.509 PEM format.
Note: The length is limited to 2,000 characters.
-
Description: (Optional) Enter a description.
-
-
Click Upload verification key.
-
The verification key is now attached to your application.
Viewing and editing a verification key
To view and edit verification key details:
-
In Portal, go to Applications.
-
Click an application name.
-
In the Application panel, click verification keys.
-
Click a verification key name.
The Verification key panel opens. You can only edit one key at a time.
-
Click the Edit button.
The Edit verification key pop-up opens. The available actions are:
- Rename.
- Certificate: The certificate can be updated.
- Description
- Deactivate or reactivate. Status can be set to active or inactive if certificate is not expired.
-
Click Save
Note: Verifications keys have an expiration date. When a verification key has expired, you can't use it anymore. To reactivate the key, update the certificate expiration into a future date. Alternatively, delete the verification key, and create a new one.
The Verification key panel has two tabs that don't offer actions:
- Summary: Basic key information, such as date created and expiration date.
- Attributes: Full key information as returned by the API.
Deleting a verification key
Note: Keys are automatically deleted if their corresponding application is deleted.
You can delete each verification key separately, or multiple keys as a bulk action from the keys list.
To permanently delete a verification key:
- In Portal, go to Applications.
- Click an application name.
- In the Application pane, click verification keys.
- Select one or more of the existing verification keys.
- Click the Actions pull-down menu.
- Click Delete.
- Confirm permanent deletion of the selected verification keys.
Alternatively, you can delete a verification key in the Verification key pane.
-
In Portal, go to Applications.
-
Click an application name.
-
In the Application pane, click verification keys.
-
Click a verification key name.
The Verification key pane opens.
-
Click the trash can icon in the top right corner of the pane.
-
Confirm permanent deletion of the selected verification key.
Creating a JWT key
A JWT is required for the REST API requests. You can learn how to generate the JWT with JWT's debugger.
The JWT payload must contain the exp claim that is the expiration time after the JWT expires.
The JWT must be signed with the private key obtained in the Creating a verification key step. Izuma Device Management supports these algorithms for signing the JWT:
- RS256.
- RS384.
- RS512.
- ES256.
- ES384.
- ES512.
- PS256.
- PS384.
- PS512.
Note: You can create up two JWT keys per application.
Creating a REST API request using JWT keys
Izuma Device Management uses the uploaded certificate and its matching public key to verify REST API requests based on JWT.
The HTTP request header must contain the key X-Application-ID with the value of your application ID the verification key is attached to. To retrieve your application ID through the Izuma Device Management Portal, see Uploading a verification key.
See the example request with JWT using the /v3/applications endpoint to list all applications.
curl -X GET https://api.us-east-1.mbedcloud.com/v3/applications \
    -H 'X-Application-ID: <APPLICATION_ID>' \
    -H 'Authorization: Bearer <JSON_WEB_TOKEN>'