Porting the Device Management Update client to Linux systems
This page describes the Linux-specific implementation of Update client, as well as requirements for porting Update client to a new Linux target.
Linux update requirements
In Linux, the update image must contain a complete root file system. Update client unpacks this file system image onto a free partition and reboots. After reboot, the bootloader selects this partition as the root partition (mounted under /).
The Linux system must have:
- A separate
cachepartition to download the update image. - An additional
rootpartition that the Update client can use for unpacking the downloaded image. - A partition where the client can store the encrypted file system that it uses internally (the
configpartition).
Note: The common solution for updates involves using two alternating root partitions. One partition (1) keeps the currently mounted root file system (/), while the other one (2) is inactive. After a new update image is downloaded, it is unpacked to the currently inactive partition 2 and the system reboots. The bootloader chooses 2 as the active partition (the one that is mounted under /) and 1 becomes the partition that receives the next update. On subsequent updates, 1 and 2 change roles in the same way.
The bootloader also needs to switch the root partition after an update. The Update client doesn't make any assumptions about the bootloader used by the Linux system, so you need to take this into consideration and implement the proper solution. Examples of interacting with various bootloaders are in the next sections.
Update workflow overview
To understand the internals of the Linux Update client, it helps to review the overall workflow for a firmware update. To start an update, you first need to create the update image (in this case, the .tar.gz root file system image). After creating the firmware image, use the manifest-tool to create the manifest file. Upload the manifest and image files to Device Management:
# Create an update certificate and a config file along with vendor ID (company domain name in manifest tool) and class ID (product model identifier).
$ manifest-tool init -d "<company domain name>" -m "<product model identifier>" -a "<Device Management access key>" -S "<Device Management Alternative API address>"
# The prepare command uploads the specified payload, creates a manifest and uploads the manifest.
$ manifest-tool update prepare -p <firmware image file>  --manifest-name <manifest name>
When the manifest-tool uploads the manifest to Device Management, the timestamp and firmware hash (SHA256) are written into the manifest file. The manifest is signed with the update certificate that is either self-generated by the manifest tool, or provided as an argument of the init command. At this point, you can go to Device Management and trigger an update campaign, or use the manifest-tool again to trigger the update campaign. When you initiate an update campaign, the target device must be running Device Management Client.
The update process:
- Device Management notifies Update client that a new update campaign has started.
- Update client fetches the manifest file.
- The client checks that the image is signed with the same update certificate as is on the device.
- If the update certificate from the image in Device Management is the same one as the one on the device, Update client checks if the Vendor ID and Class ID in the manifest are the same as the ones on the device.
- If the Vendor ID and Class ID match, Update client checks the timestamp in the manifest file. If the timestamp of the image is newer than the device's current timestamp, Update client starts to download the image to the
cachepartition. - When the image finishes downloading, it is unpacked to the spare
rootpartition. - Update client reboots the device.
- The bootloader chooses the previous partition (the one on which the new firmware image was unpacked) as the root partition (mounted under
/) and starts the Linux kernel. The process of selecting the partition to boot from is implementation-specific, but regardless of the implementation, the bootloader needs to identify which partition was used for the spare root partition.
Linux update implementation
The update process in Linux is driven mainly by shell scripts that you can adapt to a new target. Most of the Linux-specific update code is in the update-client-hub folder. The update-specific shell scripts (both generic and target-specific) are in the scripts directory.
The main scripts you may need to customize are:
arm_update_initialize.sh: Called when Update client is initialized. This script performs target-specific initialization tasks.arm_update_prepare.sh: Called before downloading the firmware image.arm_update_finalize.sh: Called after downloading the firmware image.arm_update_details.sh: Returns the version (and associated metadata) of the given firmware candidate.arm_update_active_details.sh: Returns the version (and associated metadata) of the active (running) firmware.arm_update_activate.sh: Called after the update image is downloaded. Its main purpose is to define how the image should be unpacked.
Specify which scripts to run in a C source file; see an example file. The list of functions that the implementation uses is given in an ARM_UC_PAAL_UPDATE structure used by the upper layers of the update code. This structure needs to be visible to the outside code (and therefore, can't be static). Choose it at compile time with the MBED_CLOUD_CLIENT_UPDATE_STORAGE macro. For example, to use the specific structure defined in the previous link, set the MBED_CLOUD_CLIENT_UPDATE_STORAGE=ARM_UCP_LINUX_GENERIC macro when compiling.
Note: Each implementation can use a mix of generic and target-specific Linux functions and scripts, as in this example.
When adding an implementation for a new target, it is good practice to create a new subdirectory in pal-linux/scripts with a descriptive name for the target, as well as a new source file in pal-linux/source that uses the same target-related naming scheme.
Linux update example: OpenWRT
The OpenWRT-specific implementation has two parts:
- The C source code.
- The shell scripts.
Note: The names of partitions provided here are only examples. Please ensure that your own partition names are compatible.
The implementation assumes the presence of these partitions, according to the requirements:
- Main OS partitions
rootfs1androotfs2: The partitions used for the root file system of the device. - Image storage partition: This is the
cachepartition where the downloaded firmware is located. The size of this partition must be larger than the maximum expected size of the firmware image. This partition is not required to be non-volatile, but we recommend non-volatile storage. - Encrypted file system partition (required by the client): This is the
configpartition. We recommend a minimum of 1 MB actual space. This partition must be non-volatile. - The bootloader interface uses different partitions:
- Flag partitions
flags1andflags2: The partitions to store the firmware metadata headers with timestamps and configurations for main OS partitions1and2. These partitions are OpenWRT-specific and are used to tell the bootloader which partition is the root. These partitions contain metadata headers. The default metadata header size is 112 bytes, but we recommend a minimum of two erase units of the target file system. These partitions must be non-volatile. - Partitions for bootloader and BSP private usage. These partitions must be non-volatile.
- Flag partitions
Example partition layout on reference target (Qualcomm Atheros IPQ4019):
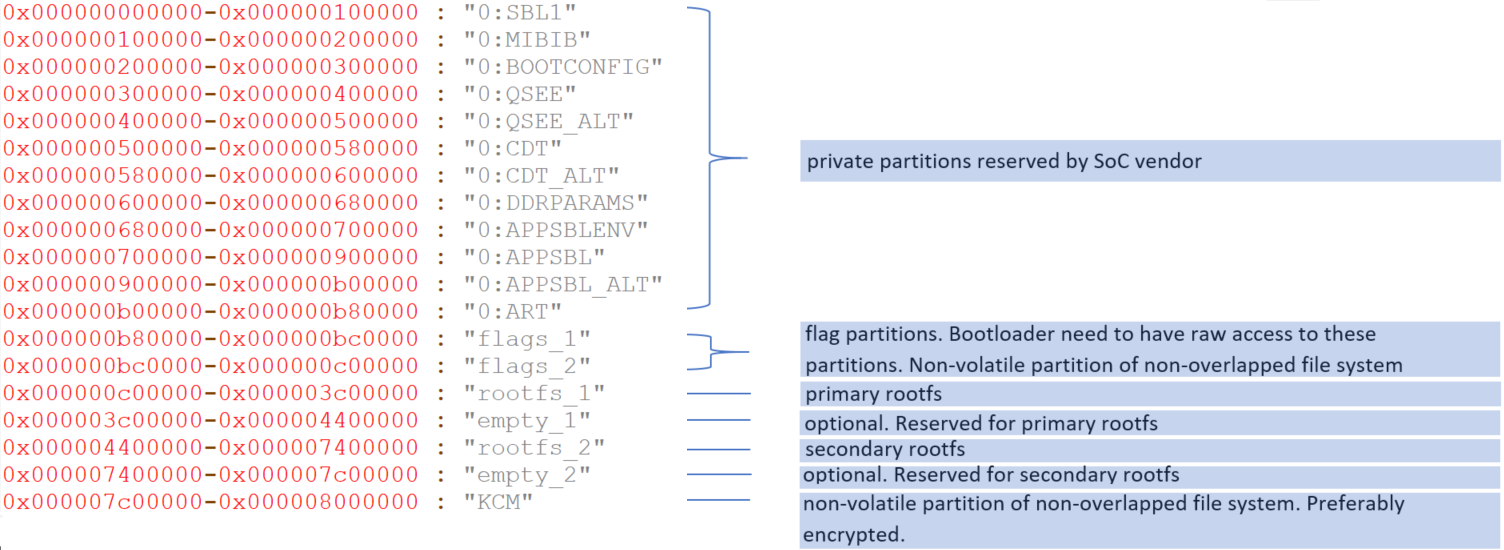
In this example partition layout, the cache partition is not present as the flash has only limited space. Alternatively, you can place the downloaded firmware in /tmp in RAM. In this case, downloaded firmware images (update firmware candidates) are not kept after reboot.
When the device is notified of an update image:
- Update client writes the timestamp and SHA256 hash of the image to the metadata header (to partition
flags1if the current image resides onrootfs2, or toflags2if current image resides onrootfs1). - Downloads the firmware image into the
cachepartition and uncompresses it into the spare root partition (rootfs1if the current image resides onrootfs2, orrootfs2if the current image resides onrootfs1). - If the flash process completes successfully, the script erases the original metadata header of the image (erase
flags1if original firmware resides onrootfs1, or eraseflags2if original firmware resides onrootfs2). - After erasing the target flag partition, the device reboots.
After the reboot, the bootloader determines which partition to boot from. It checks which flags partition is valid. This is why the original flag partition is erased in the last step before reboot, as it invalidates the partition.
Note: The order of operations is important. Erasing the original partition must be the last step of the image upgrade process because we need to ensure that the device still boots if there is a power loss during the image flashing (power-failure-safe).
The OpenWRT bootloader needs to be able to determine which flag partition is valid and boot from that partition. Either modify the bootloader or run a custom boot script. We recommend the latter solution, since it is generally easier to implement.
To determine which flag partition is valid, calculate the CRC of both flags1 and flags2 partitions. Below is a sample script to determine the partition to boot:
# set header 0 addresses and variables
set MEMORY_ADDR_START 0x84000000
set FLAGS_1          0x00B80000
set HEADER_1_START   MEMORY_ADDR_START+0x0
set HEADER_1_TIME_0  MEMORY_ADDR_START+0x8
set HEADER_1_TIME_1  MEMORY_ADDR_START+0x9
set HEADER_1_TIME_2  MEMORY_ADDR_START+0xA
set HEADER_1_TIME_3  MEMORY_ADDR_START+0xB
set HEADER_1_TIME_4  MEMORY_ADDR_START+0xC
set HEADER_1_TIME_5  MEMORY_ADDR_START+0xD
set HEADER_1_TIME_6  MEMORY_ADDR_START+0xE
set HEADER_1_TIME_7  MEMORY_ADDR_START+0xF
set HEADER_1_CRC32_0 MEMORY_ADDR_START+0x6F
set HEADER_1_CRC32_1 MEMORY_ADDR_START+0x6E
set HEADER_1_CRC32_2 MEMORY_ADDR_START+0x6D
set HEADER_1_CRC32_3 MEMORY_ADDR_START+0x6C
set HEADER_1_VALID   0

# set header 1 addresses and variables
set FLAGS_2          0x00BC0000
set HEADER_2_START   MEMORY_ADDR_START+0x100
set HEADER_2_TIME_0  MEMORY_ADDR_START+0x108
set HEADER_2_TIME_1  MEMORY_ADDR_START+0x109
set HEADER_2_TIME_2  MEMORY_ADDR_START+0x10A
set HEADER_2_TIME_3  MEMORY_ADDR_START+0x10B
set HEADER_2_TIME_4  MEMORY_ADDR_START+0x10C
set HEADER_2_TIME_5  MEMORY_ADDR_START+0x10D
set HEADER_2_TIME_6  MEMORY_ADDR_START+0x10E
set HEADER_2_TIME_7  MEMORY_ADDR_START+0x10F
set HEADER_2_CRC32_0 MEMORY_ADDR_START+0x16F
set HEADER_2_CRC32_1 MEMORY_ADDR_START+0x16E
set HEADER_2_CRC32_2 MEMORY_ADDR_START+0x16D
set HEADER_2_CRC32_3 MEMORY_ADDR_START+0x16C
set HEADER_2_VALID   0

# CRC calculation
set CRC_ADDRESS_0 MEMORY_ADDR_START+0x100000
set CRC_ADDRESS_1 MEMORY_ADDR_START+0x100001
set CRC_ADDRESS_2 MEMORY_ADDR_START+0x100002
set CRC_ADDRESS_3 MEMORY_ADDR_START+0x100003

# header dimensions
set HEADER_SIZE 0x70
set HEADER_PAYLOAD_SIZE 0x6C

################################################################################
# Copy headers into memory
################################################################################

# read header 1 into memory
nand read $HEADER_1_START $FLAGS_1 $HEADER_SIZE

# read header 2 into memory
nand read $HEADER_2_START $FLAGS_2 $HEADER_SIZE

################################################################################
# Validate header CRC
################################################################################

# calculate header 1 CRC
crc32 $HEADER_1_START $HEADER_PAYLOAD_SIZE $CRC_ADDRESS_0

# HEADER_1_VALID to one if CRC checks out
if cmp.b $HEADER_0_CRC32_0 $CRC_ADDRESS_0 1 &&
   cmp.b $HEADER_0_CRC32_1 $CRC_ADDRESS_1 1 &&
   cmp.b $HEADER_0_CRC32_2 $CRC_ADDRESS_2 1 &&
   cmp.b $HEADER_0_CRC32_3 $CRC_ADDRESS_3 1; then
    set HEADER_1_VALID 1;
fi

# calculate header 2 CRC
crc32 $HEADER_2_START $HEADER_PAYLOAD_SIZE $CRC_ADDRESS_0

# HEADER_2_VALID to one if CRC checks out
if cmp.b $HEADER_2_CRC32_0 $CRC_ADDRESS_0 1 &&
   cmp.b $HEADER_2_CRC32_1 $CRC_ADDRESS_1 1 &&
   cmp.b $HEADER_2_CRC32_2 $CRC_ADDRESS_2 1 &&
   cmp.b $HEADER_2_CRC32_3 $CRC_ADDRESS_3 1; then
    set HEADER_2_VALID 1;
fi

################################################################################
# Deduce which partition to boot from
################################################################################

#
# First boot -> no valid headers -> choose default slot 1
# 1st update -> valid header in slot 2 -> choose slot 2
# 2nd update -> valid header in slot 1 and 2 -> choose slot 1
# 3rd update -> valid header in slot 2 -> choose slot 2
#
if test $HEADER_1_VALID -eq 1 && test $HEADER_2_VALID -eq 1; then
    echo "[BOOT] Both headers are valid, use default slot 1";
    set CHOSEN_ONE 1;
elif test $HEADER_1_VALID -eq 1; then
    echo "[BOOT] Header 1 is valid, choose slot 1";
    set CHOSEN_ONE 1;
elif test $HEADER_2_VALID -eq 1; then
    echo "[BOOT] Header 2 is valid, choose slot 2";
    set CHOSEN_ONE 2;
else
    echo "[BOOT] No valid header found, use default slot 1";
    set CHOSEN_ONE 1;
fi
Note: Change the addresses of FLAGS_1 and FLAGS_2 to the actual address of the target. MEMORY_ADDR_START is the target-specific address of the SoC RAM.
A default metadata header with timestamp 0 is also installed on the device. Since the timestamp of the default header is 0, Update client can accept any image with a valid manifest, as the image won't be blocked by the rollback protection feature of Update client. The values of HEADER_SIZE and HEADER_PAYLOAD_SIZE above are based on this default header.