Deploying containerized applications
This document contains instructions about using container orchestration.
Prerequisites
- A Pelion account with administrator-level user rights.
- kubectl version 1.14.3.
- A gateway running Pelion Edge.
Note: Contact us to request we enable Kubernetes-as-a-Service (KaaS) features in your Pelion account. By default, deploying containerized applications isn't enabled.
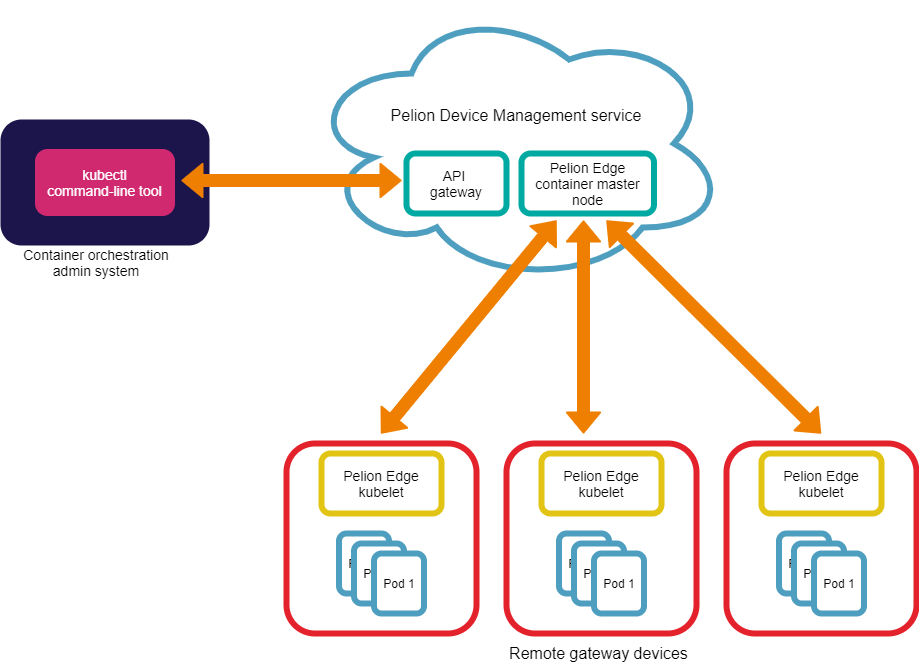
Getting started
The Pelion Edge subset of Kubernetes provides various tools that the gateway administrator can run from a local workstation for container orchestration. To use Kubernetes tools, such as kubectl, with Pelion, you need to acquire an access key.
Create an access key
-
Log in to the Pelion Device Management Portal for your region:
-
Create an application by using the instructions from the Pelion Device Management documentation.
-
Navigate to the Access Management section in the menu on the left.
-
Click on Access keys.
Note: If the Access keys section is not visible to you, please have your administrator upgrade your account to the administrator level or have the admininistrator create the access key for you.
-
Click on the New access key button.
-
Wait for the Create access key dialog box to appear.
-
Enter a unique and easily recognizable name for your access key in the dialog box.
-
Select the application the new access key will be associated with.
-
Give a description for the new access key.
-
Click Create access key.
The access key is displayed as plain text, with a Copy to Clipboard button.
-
Copy the access key to your clipboard. You will use the access key when creating a
kubeconfigfile.Note: You will not see the full access key with its secret part again. Please, copy it to a safe location.
Create a kubeconfig file
Most Kubernetes tools, including kubectl, require a kubeconfig file that contains cluster addresses and credentials for communicating with those clusters.
-
On your local machine, use this to generate a file:
apiVersion: v1 clusters: - cluster: server: https://edge-k8s.us-east-1.mbedcloud.com name: edge-k8s contexts: - context: cluster: edge-k8s user: edge-k8s name: edge-k8s current-context: edge-k8s kind: Config preferences: {} users: - name: edge-k8s user: token: **YOUR-ACCESS-KEY-HERE** -
Fill in your access key where it says YOUR-ACCESS-KEY-HERE.
-
Put this file in your home directory under
~/.kube/config. If you already have a kubeconfig file, you can merge the cluster, context and user into that file. To select theedge-k8scontext, run thekubectl configcommand on your local machine:$ kubectl config use-context edge-k8s
Listing nodes to verify connected gateways
Make sure kubectl can talk to edge-k8s by listing nodes in your account to see which gateways are connected. To list nodes and their node IDs, use:
kubectl get nodes
For more information, please see the Kubernetes documentation.
Deploying a Pod
This example illustrates how to deploy a basic Pod using kubectl and how to use the kubectl logs and kubectl exec command to inspect and interact with the Pod.
Note: The kubectl config credential is now an access key you create in Device Management Portal, making credential management self-service.
Note: Alpine Linux with musl c has known issues with DNS resolving. See details and alternatives in the Troubleshooting section.
-
Copy this YAML to a file
pod.yaml, and replacenodeNameYOUR-NODE-ID-HERE with your node's ID (fromkubectl get nodes):apiVersion: v1 kind: Pod metadata: name: test-pod spec: automountServiceAccountToken: false hostname: test-pod nodeName: **YOUR-NODE-ID-HERE** containers: - name: client image: alpine:3.9 command: ["/bin/sh"] args: ["-c","echo 'hello'; sleep 6000000"] -
Deploy this Pod:
$ kubectl create -f pod.yaml pod/test-pod created $ kubectl get pods NAME READY STATUS RESTARTS AGE test-pod 0/1 ContainerCreating 0 9s $ kubectl get pods NAME READY STATUS RESTARTS AGE test-pod 1/1 Running 0 85s -
View Logs:
$ kubectl logs test-pod hello -
Execute commands:
$ kubectl exec -it test-pod -- sh / # echo "hi" hi / # ls bin dev etc home lib media mnt opt proc root run sbin srv sys tmp usr var / # exit $ -
Delete the Pod when finished:
$ kubectl delete pod test-pod
Configuring a Pod
You can use ConfigMaps and Secrets to configure Pods. This example creates a ConfigMap and Secret and shows how you can mount them as volumes inside a Pod.
-
Create a
ConfigMapinmy-cm.yaml:apiVersion: v1 kind: ConfigMap metadata: name: my-cm data: example.txt: my config map -
Create a
Secretinmy-secret.yaml:apiVersion: v1 kind: Secret metadata: name: my-secret type: Opaque data: example.txt: bXkgc2VjcmV0Cg== -
Use
kubectlto create theConfigMapandSecret:$ kubectl create -f my-cm.yaml configmap/my-cm created $ kubectl create -f my-secret.yaml secret/my-secret created -
Create
pod.yaml, and replacenodeNameYOUR-NODE-ID-HERE with your node's ID:apiVersion: v1 kind: Pod metadata: name: test-pod spec: automountServiceAccountToken: false containers: - args: - -c - echo "$(cat /my_secret/example.txt /my_cm/example.txt)"; sleep 6000000 command: - /bin/sh image: alpine:3.9 name: client volumeMounts: - mountPath: /my_secret name: examplesecret - mountPath: /my_cm name: examplecm hostname: test-pod nodeName: **YOUR-NODE-ID-HERE** volumes: - name: examplecm configMap: name: my-cm - name: examplesecret secret: secretName: my-secret -
Use
kubectlto create the Pod.$ kubectl create -f pod.yaml pod/test-pod created -
View Logs:
$ kubectl logs test-pod my secret my config map -
Execute commands:
$ kubectl exec -it test-pod -- sh / # ls /my_secret/example.txt /my_secret/example.txt / # cat /my_secret/example.txt my secret / # ls /my_cm/example.txt /my_cm/example.txt / # cat /my_cm/example.txt my config map/ # exit $ -
Delete the Pod when finished:
$ kubectl delete pod test-pod
Service discovery
Pods often represent different applications on a gateway that need to talk to one another. Rather than using a static IP address for one of the Pods, use a Pod's hostname when addressing it and use DNS for service discovery.
-
Create
test-pod.yaml, and replacenodeNameYOUR-NODE-ID-HERE with your node's ID:apiVersion: v1 kind: Pod metadata: name: test-pod spec: automountServiceAccountToken: false hostname: test-pod nodeName: **YOUR-NODE-ID-HERE** containers: - name: client image: alpine:3.9 command: ["/bin/sh"] args: ["-c","echo 'hello'; sleep 6000000"] -
Use
kubectlto create test-pod:$ kubectl create -f test-pod.yaml pod/test-pod created -
Create
nginx-pod.yaml, and replacenodeNameYOUR-NODE-ID-HERE with your node's ID:apiVersion: v1 kind: Pod metadata: name: nginx spec: automountServiceAccountToken: false containers: - image: nginx:1.17 name: nginx hostname: nginx nodeName: **YOUR-NODE-ID-HERE** restartPolicy: Always -
Use
kubectlto create nginx:$ kubectl create -f nginx-pod.yaml pod/nginx created -
Execute a shell inside the
test-pod. The host namenginxresolves to the IP address of the nginx Pod. After installing curl insidetest-pod, you can make an HTTP request to the nginx Pod using a curl command:$ kubectl exec -it test-pod -- sh / # nslookup BusyBox v1.29.3 (2019-01-24 07:45:07 UTC) multi-call binary. Usage: nslookup HOST [DNS_SERVER] Query DNS about HOST / # nslookup nginx nslookup: can't resolve '(null)': Name does not resolve Name: nginx Address 1: 10.0.0.2 k8s_POD_nginx_default_140806bb-30cc-11ea-83d4-627982ffddac_0.edgenet / # apk add curl fetch http://dl-cdn.alpinelinux.org/alpine/v3.9/main/x86_64/ APKINDEX.tar.gz fetch http://dl-cdn.alpinelinux.org/alpine/v3.9/community/x86_64/ APKINDEX.tar.gz (1/5) Installing ca-certificates (20190108-r0) (2/5) Installing nghttp2-libs (1.35.1-r1) (3/5) Installing libssh2 (1.9.0-r1) (4/5) Installing libcurl (7.64.0-r3) (5/5) Installing curl (7.64.0-r3) Executing busybox-1.29.3-r10.trigger Executing ca-certificates-20190108-r0.trigger OK: 7 MiB in 19 packages / # curl curl: try 'curl --help' or 'curl --manual' for more information / # curl http://nginx <!DOCTYPE html> <html> <head> <title>Welcome to nginx!</title> <style> body { width: 35em; margin: 0 auto; font-family: Tahoma, Verdana, Arial, sans-serif; } </style> </head> <body> <h1>Welcome to nginx!</h1> <p>If you see this page, the nginx web server is successfully installed and working. Further configuration is required.</p> <p>For online documentation and support please refer to <a href="http://nginx.org/">nginx.org</a>.<br/> Commercial support is available at <a href="http://nginx.com/">nginx.com</a>.</p> <p><em>Thank you for using nginx.</em></p> </body> </html> / # exit -
Delete the Pods when finished:
$ kubectl delete pod test-pod
$ kubectl delete pod nginx
Best practices
-
When deleting a gateway through the Device Management API, be sure to delete the nodes associated with it through the Kubernetes API.
To delete nodes, use:
kubectl delete node <node-name>For more information, please see the Kubernetes documentation.
-
Set
hostNetworktofalseto access Pelion Edge's Container Network Interface (CNI) instead of using the host's networking namespace directly. -
Check your containers with Kubescape before deploying.
Troubleshooting
Host network conflicts with internal network in LmP-based gateways
Kubelet on the gateway uses internal networking for both normal operation and network policy control. In some instances, when a gateway is deployed in the field, these internal addresses can conflict with the host address assignement. For example, eth0 gets assigned an IP address in the same subnet range as the internal networking for kube-router's network policy control. To fix this problem:
-
Reference the following table for IP address conflicts:
IP address Subnet Files containing addresses 10.0.0.50 N/A /wigwag/system/bin/launch-kubelet.sh 10.240.0.1 10.240.0.0/24 /wigwag/system/bin/launch-kubelet.sh
/wigwag/system/bin/launch-kube-router.sh
/wigwag/system/bin/launch-coredns.sh
/wigwag/system/var/lib/coredns/corefile -
Select a new address or subnet by modifying the referenced files.
DNS issues with musl c and Alpine Linux
musl libc, used in Alpine Linux, has well-known DNS problems and doesn't reliably run many programs that require DNS lookups. The relevant DNS problems in Alpine Linux with musl, which affect Pelion (and all containers), are outlined in docker-alpine. You can see a detailed difference between musl and glibc in wiki.musl-libc.org.
We have tested a few different AArch64 compatible images with these results:
| Name | Version | Works | Size |
|---|---|---|---|
| arm64v8/alpine | 3.15 | No | 5.35MB |
| alpine | 3.15 | No | 5.61MB |
| woahbase/alpine-glibc:armhf | 3.15 | No | 34.6MB |
| minidocks/glibc | 3.14 | No | 15.4MB |
| ubuntu | 22.04 | Yes | 76.2MB |
| arm64v8/busybox | 1.34 | Yes | 1.41MB |
| debian | stable-slim | Yes | 80.4MB |
| bitnami/minideb | buster | Yes | 67.5MB |